

05Sep
ESP32 with a 0.96-inch OLED display
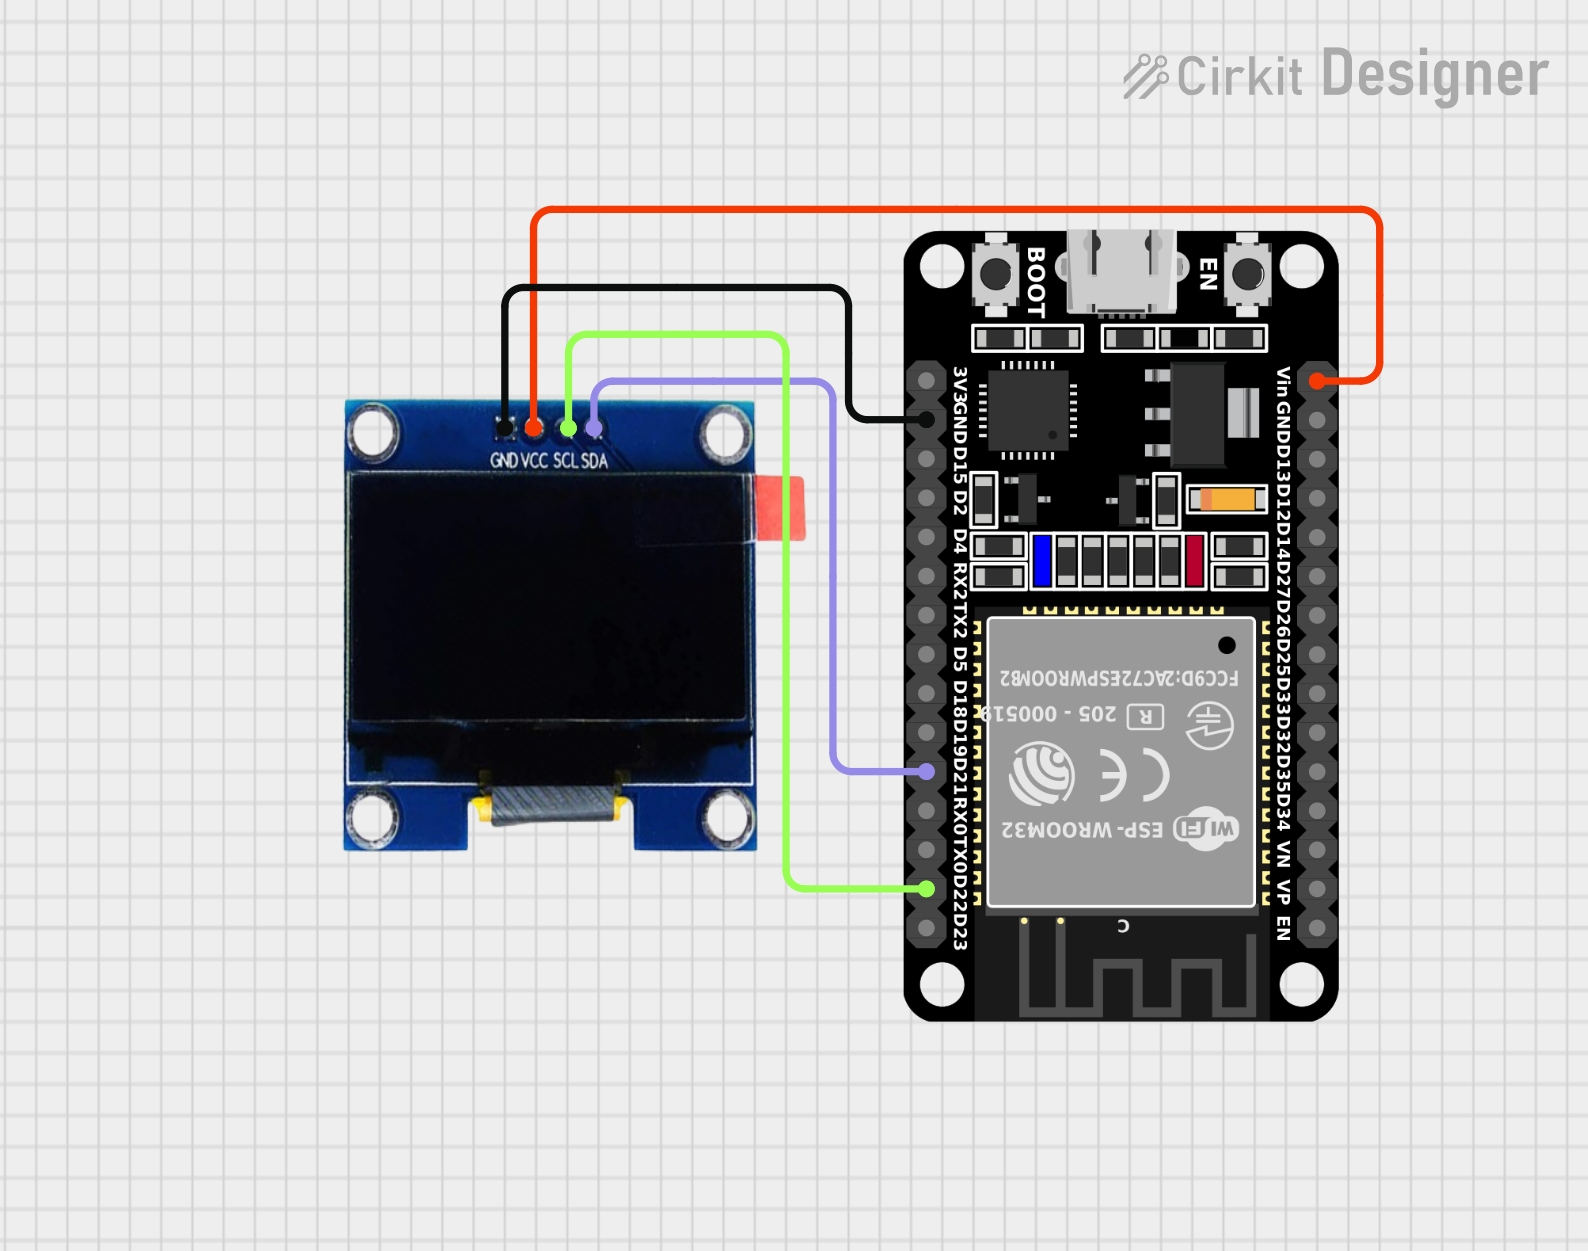
ESP32 with a 0.96-inch OLED display:
Hardware Setup:
- Gather the necessary components:
- ESP32 development board
- 0.96-inch OLED display module
- Jumper wires
- Breadboard (optional)
- Power supply (3.3V or 5V)
- Connect the OLED display to the ESP32:
- Connect the VCC pin of the OLED display to the 3.3V or 5V output of the ESP32.
- Connect the GND pin of the OLED display to the ground pin of the ESP32.
- Connect the SCL pin of the OLED display to the SCL pin of the ESP32.
- Connect the SDA pin of the OLED display to the SDA pin of the ESP32.
Software Setup:
- Install the Arduino IDE: Download and install the Arduino IDE from https://support.arduino.cc/hc/en-us/articles/360019833020-Download-and-install-Arduino-IDE.
- Install the ESP32 board support package: Open the Arduino IDE, go to File > Preferences, and add the following URL to the Additional Boards Manager URLs field:
https://dl.espressif.com/package/esp32/index.json. Then, go to Tools > Board > Boards Manager and install the “ESP32” board. - Install the Adafruit SSD1306 library: Search for “Adafruit SSD1306” in the Library Manager and install it.
Code:
C++
#include <Wire.h>
#include <Adafruit_GFX.h>
#include <Adafruit_SSD1306.h>

#define SCREEN_WIDTH 128 // OLED display width
#define SCREEN_HEIGHT 64 // OLED display height

Adafruit_SSD1306 display(SCREEN_WIDTH, SCREEN_HEIGHT, &Wire);

void setup() {
  Wire.begin();
  display.begin(SSD1306_SWITCHCAPVCC, 0x3C); // Address may vary
  display.clearDisplay();
  display.display();
}

void loop() {
  display.clearDisplay();

  // Draw text
  display.setTextSize(1);
  display.setTextColor(WHITE);
  display.setCursor(0, 0);
  display.println("Hello, world!");

  // Draw a rectangle
  display.drawRect(10, 10, 100, 30, WHITE);

  // Display the image
  display.display();

  delay(2000);
}
Explanation:
- The code includes the necessary libraries for I2C communication, graphics, and the OLED display.
- The
SCREEN_WIDTHandSCREEN_HEIGHTconstants define the dimensions of the OLED display. - In the
setup()function, I2C is initialized, the OLED display is initialized, and the display is cleared. - In the
loop()function, the display is cleared, text is drawn, a rectangle is drawn, and the image is displayed.
Uploading the Code:
- Connect the ESP32 to your computer.
- Select the correct board and port in the Arduino IDE.
- Compile and upload the code to the ESP32.
Testing:
- Observe the OLED display to see the text and rectangle being drawn.
Additional Notes:
- You can customize the code to display different text, shapes, images, or animations on the OLED display.
- The OLED display’s address might vary depending on the specific model. You might need to adjust the address in the
display.begin()function. - Consider using a library or framework like ThingSpeak or Blynk to control the OLED display remotely.
By following these steps, you can effectively use an ESP32 to display information on a 0.96-inch OLED display.


Leave a Reply
You must be logged in to post a comment.