


05Sep
ESP32 with a DHT11 sensor module
ESP32 with a DHT11 sensor module:
Hardware Setup:
- Gather the necessary components:
- ESP32 development board
- DHT11 sensor module
- Jumper wires
- Breadboard (optional)
- Power supply (3.3V or 5V)
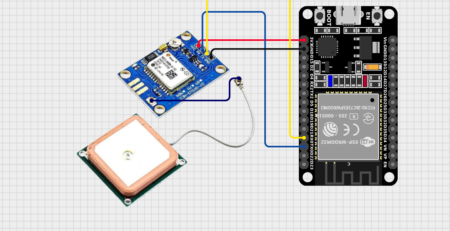
- Connect the DHT11 sensor to the ESP32:
- Connect the VCC pin of the sensor to the 3.3V or 5V output of the ESP32.
- Connect the GND pin of the sensor to the ground pin of the ESP32.
- Connect the data pin of the sensor (usually labeled “D”) to a digital input pin on the ESP32 (e.g., GPIO13).
Software Setup:
- Install the Arduino IDE: Download and install the Arduino IDE from https://support.arduino.cc/hc/en-us/articles/360019833020-Download-and-install-Arduino-IDE.
- Install the ESP32 board support package: Open the Arduino IDE, go to File > Preferences, and add the following URL to the Additional Boards Manager URLs field:
https://dl.espressif.com/package/esp32/index.json. Then, go to Tools > Board > Boards Manager and install the “ESP32” board. - Install the DHT11 library: Search for “DHT11 from adafruit” in the Library Manager and install it.
Code:
C++
#include <DHT.h>

#define DHTTYPE DHT11

#define DHTPIN 18 //change pin as per your board

DHT dht(DHTPIN, DHTTYPE);

void setup() {
  dht.begin();
}

void loop() {
  // Wait for sensor reading
  delay(1000);

  // Read temperature and humidity
  float humidity = dht.readHumidity();
  float temperature = dht.readTemperature();

  // Check for errors
  if (isnan(humidity) || isnan(temperature)) {
    Serial.println("Failed to read from DHT sensor!");
    return;
  }

  // Print the values
  Serial.print("Humidity: ");
  Serial.print(humidity);
  Serial.print("    %  Temperature: ");
  Serial.print(temperature);
  Serial.println(" °C");
}
Explanation:
- The code includes the necessary DHT11 library.
- The
DHTTYPEandDHTPINconstants define the DHT11 sensor type and the GPIO pin connected to it. - In the
setup()function, the DHT11 sensor is initialized. - In the
loop()function, thereadHumidity()andreadTemperature()functions are used to read the humidity and temperature values from the sensor. - The
isnan()function is used to check for errors in the sensor readings. - The values are then printed to the serial monitor.
Uploading the Code:
- Connect the ESP32 to your computer.
- Select the correct board and port in the Arduino IDE.
- Compile and upload the code to the ESP32.
Testing:
- Open the serial monitor in the Arduino IDE.
- Observe the humidity and temperature values being printed.
Additional Notes:
- The DHT11 sensor has a relatively slow reading rate. If you need faster readings, consider using a DHT22 or DHT21 sensor.
- You can customize the code to perform different actions based on the sensor readings (e.g., triggering alarms, controlling devices).
- Consider using a library or framework like ThingSpeak or Blynk to visualize and analyze the sensor data.
By following these steps, you can effectively use an ESP32 to measure temperature and humidity using a DHT11 sensor.


Leave a Reply
You must be logged in to post a comment.