

ESP32 with IR Sensor
ESP32 with IR Sensor: A Beginner’s Guide
Introduction
The ESP32 is a powerful and versatile microcontroller that has gained immense popularity in the IoT and embedded systems world. Its low cost, high performance, and rich feature set make it an ideal choice for various projects. One of the interesting applications of the ESP32 is to integrate it with an infrared (IR) sensor to detect and measure infrared radiation. In this blog post, we’ll explore how to connect an IR sensor to an ESP32 and write code to read and interpret the sensor data.
Understanding IR Sensors
Infrared sensors are electronic components that detect infrared radiation. They are widely used in applications such as remote controls, motion detection, and object sensing. There are different types of IR sensors, but for this tutorial, we’ll focus on photodiodes and phototransistors.
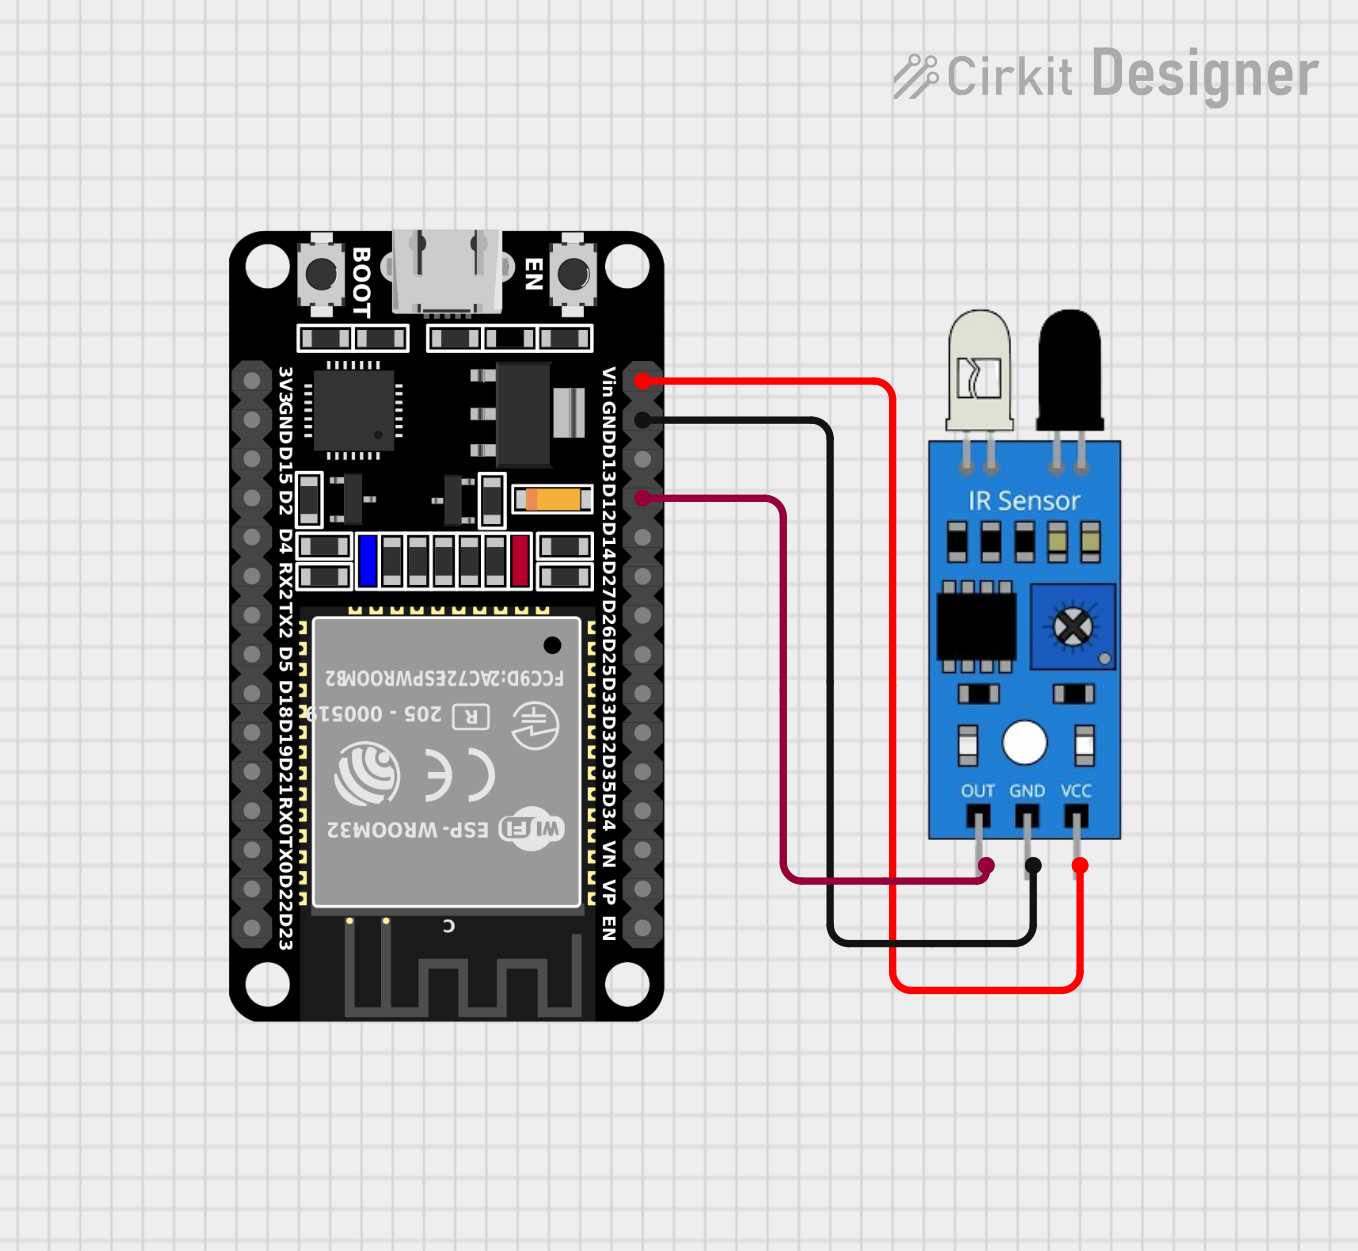
Connecting the IR Sensor to ESP32
To connect an IR sensor to an ESP32, you’ll need the following components:
- ESP32 development board
- IR sensor (photodiode or phototransistor)
- Resistors (one for pull-up and one for current limiting, if necessary)
- Breadboard
- Jumper wires
The specific connections will depend on the type of IR sensor you’re using. Here’s a general example for a photodiode:
- Connect the anode of the photodiode to a digital input pin on the ESP32.
- Connect the cathode of the photodiode to a pull-up resistor and then to ground.
Writing Code to Read IR Sensor Data
Once the IR sensor is connected, you can write code to read and interpret the sensor data. Here’s a basic example using the Arduino IDE for ESP32:
In this code:
const int sensorPin = 12;

void setup() {
pinMode(sensorPin, INPUT);
}

void loop() {
int sensorValue = digitalRead(sensorPin);

if (sensorValue == HIGH) {
Serial.println("Object detected");
} else {
Serial.println("No object detected");
}

delay(1000);
}- We define the IR sensor pin number.
- We set the IR sensor pin as an input.
- In the
loopfunction, we read the value from the IR sensor usingdigitalRead. - If the sensor value is
HIGH, it means infrared radiation is being detected. Otherwise, the sensor value isLOW. - We print a message to the serial monitor to indicate whether the sensor detected something.
Applications of IR Sensors with ESP32
There are numerous applications for IR sensors with ESP32, including:
- Remote control: Build a universal remote control that can control various devices.
- Motion detection: Create a security system that triggers an alarm when motion is detected.
- Object sensing: Develop a robot that can avoid obstacles using IR sensors.
- Temperature measurement: Measure temperature using an IR thermometer and display the readings on an ESP32-based device.
Conclusion
Integrating an IR sensor with an ESP32 opens up a world of possibilities for creating interesting and useful projects. By following the steps outlined in this guide, you can easily connect an IR sensor to your ESP32 and write code to read and interpret the sensor data. With a little creativity, you can come up with countless innovative applications for this powerful combination.


Leave a Reply
You must be logged in to post a comment.