

Interfacing IR Sensor with Raspberry Pi Pico Using MicroPython – Complete Guide
Here is a complete, ready-to-publish WordPress blog article on using Raspberry Pi Pico with an IR Sensor using MicroPython. It includes headings, formatting, code blocks, images suggestions, and SEO-friendly content.
Interfacing IR Sensor with Raspberry Pi Pico Using MicroPython Complete Guide
Infrared (IR) sensors are among the simplest and most widely used electronic components for object detection, motion sensing, and line-following applications. When combined with the power of the Raspberry Pi Pico, the possibilities become endless—from smart automation systems to DIY robotics projects.
In this tutorial, we will learn how to interface an IR sensor with a Raspberry Pi Pico using MicroPython. By the end, you’ll be able to read IR sensor values and trigger actions based on object detection.
What You Need
- Raspberry Pi Pico / Pico W
- IR Sensor Module (Obstacle detection sensor)
- Jumper wires
- Micro USB cable
- Thonny IDE
Understanding the IR Sensor Module
An IR sensor typically has:
- IR LED – emits infrared light
- Photodiode – detects reflected IR light
- Comparator (LM393) – generates digital output
- Potentiometer – sensitivity adjustment
- Output Pins: VCC, GND, OUT
When an object comes close, IR light reflects back, and the sensor outputs LOW (0).
When no object is present, it outputs HIGH (1).
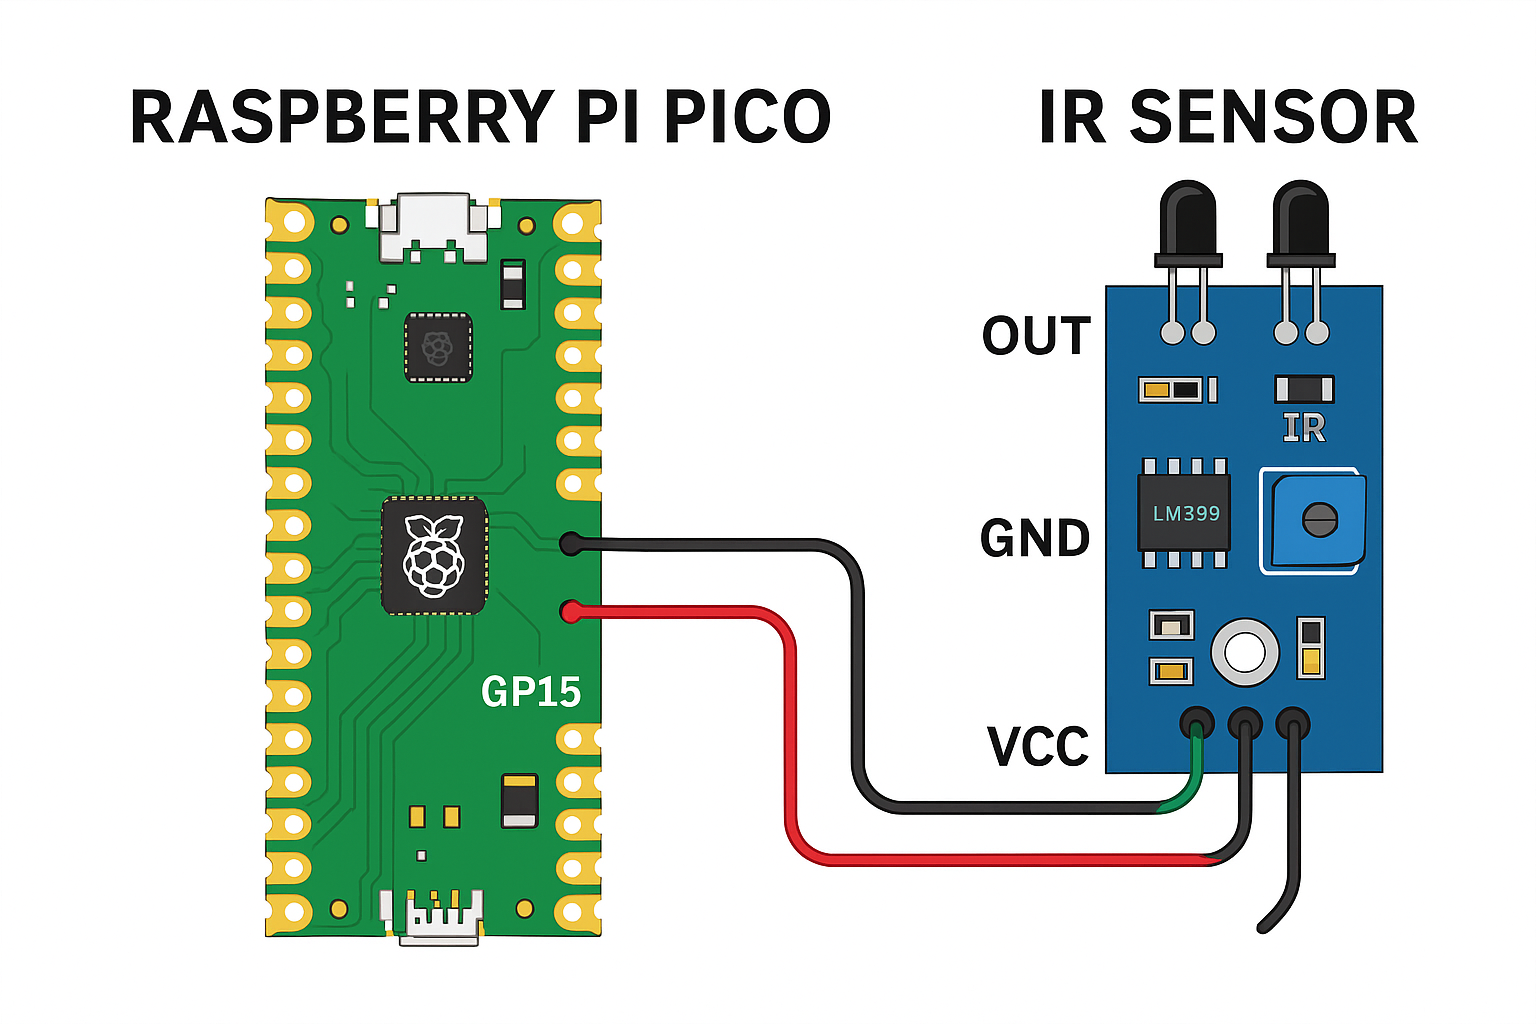
Circuit Diagram – Pico & IR Sensor
Connections
| IR Sensor Pin | Raspberry Pi Pico Pin |
|---|---|
| VCC | 3.3V |
| GND | GND |
| OUT | GP15 (or any GPIO) |
Tip: IR sensors work fine at 3.3V. Do NOT connect anything directly to 5V GPIO.
MicroPython Code for Reading IR Sensor
Open Thonny IDE, select your Pico, and paste the following code:
from machine import Pin
import time

# Connect IR sensor OUT to GP15
ir = Pin(15, Pin.IN)

while True:
    if ir.value() == 0:
        print("Object Detected!")
    else:
        print("No Object")
    time.sleep(0.2)
How It Works
Pin.INsets GP15 as an input pin.ir.value()returns0when object is detected.- Loop continuously reads sensor status.
Adding an LED Indicator (Optional)
If you want an LED to turn ON when an object is detected:
Connections
- LED → GP14
- 220 Ohm resistor → GND
Code
from machine import Pin
import time

ir = Pin(15, Pin.IN)
led = Pin(14, Pin.OUT)

while True:
    if ir.value() == 0:
        led.value(1)
        print("Object Detected!")
    else:
        led.value(0)
        print("No Object")
    time.sleep(0.1)
Applications of IR Sensor with Raspberry Pi Pico
This simple setup can be used in:
- Line-following robots
- Human/object detection
- Automatic lights
- Security alarms
- Counter systems
- Smart parking systems
Troubleshooting Tips
| Issue | Solution |
|---|---|
| Sensor gives unstable output | Adjust potentiometer |
| False detection in sunlight | Use IR shroud or shielding |
| No output | Check wiring & voltage |
| LED always ON | Increase sensing distance |
Conclusion
Using an IR sensor with the Raspberry Pi Pico is an excellent way to get started with sensors and MicroPython. Whether you’re building a robot or home automation system, this sensor is extremely useful, affordable, and easy to integrate.
Leave a Reply
You must be logged in to post a comment.