

🔧 How to Set Up and Use MPU6050 with ESP32 (Complete Guide)
The MPU6050 is a powerful motion sensor that combines a 3-axis accelerometer and a 3-axis gyroscope in a single module. When paired with ESP32, it becomes ideal for robotics, IoT, motion tracking, and smart automation projects.
In this guide, you’ll learn how to connect MPU6050 with ESP32, install libraries, upload code, and read motion data step by step.
📦 Components Required
- ESP32 development board
- MPU6050 accelerometer & gyroscope sensor
- Breadboard
- Jumper wires
- USB cable
- Arduino IDE
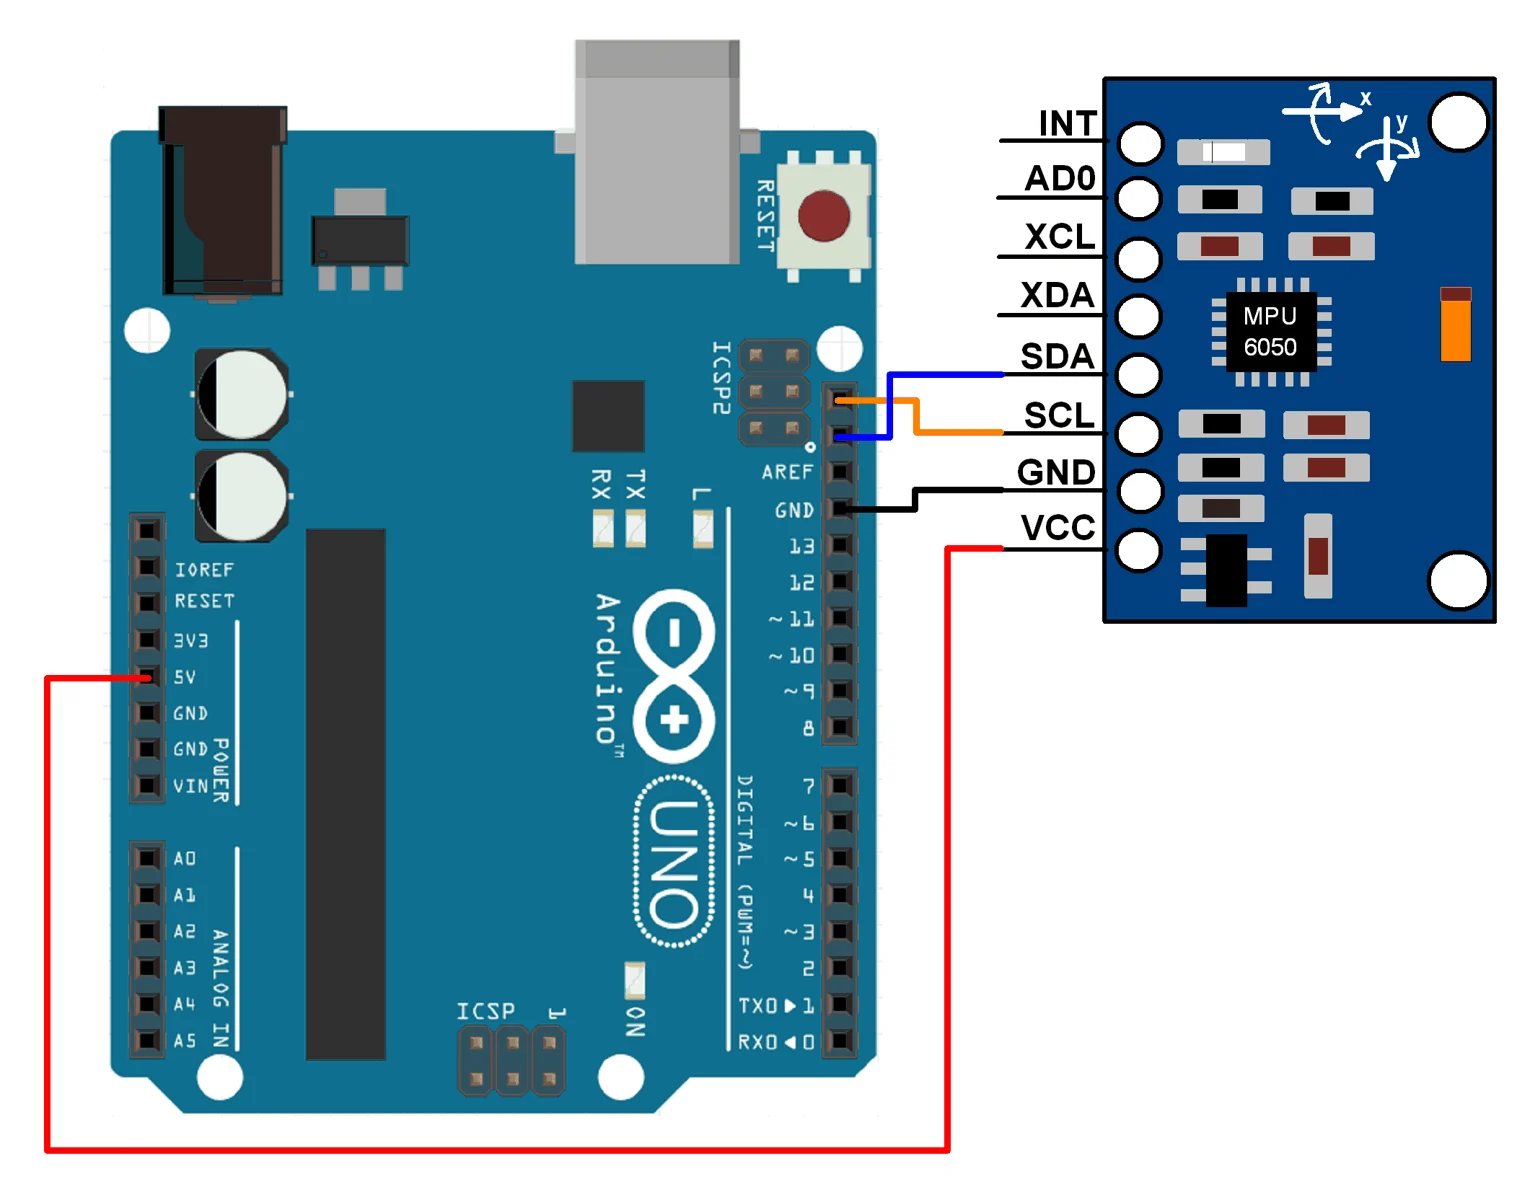
📌 MPU6050 Pinout
The MPU6050 module typically has the following pins:
| MPU6050 Pin | Description |
|---|---|
| VCC | Power supply (3.3V) |
| GND | Ground |
| SDA | I2C data line |
| SCL | I2C clock line |
| INT | Interrupt (optional) |
⚠️ Important: Use 3.3V, not 5V, when connecting to ESP32.
🔌 ESP32 to MPU6050 Wiring
Connect the sensor to ESP32 as follows:
| MPU6050 | ESP32 |
|---|---|
| VCC | 3.3V |
| GND | GND |
| SDA | GPIO 21 |
| SCL | GPIO 22 |
📌 GPIO 21 and 22 are default I2C pins on ESP32.
🛠️ Install Required Library (Arduino IDE)
- Open Arduino IDE
- Go to Sketch → Include Library → Manage Libraries
- Search for MPU6050 by Electronic Cats or Adafruit MPU6050
- Install the library
🧪 ESP32 MPU6050 Example Code
Paste the following code into Arduino IDE:
#include <Wire.h>
#include <Adafruit_MPU6050.h>
#include <Adafruit_Sensor.h>

Adafruit_MPU6050 mpu;

void setup() {
  Serial.begin(115200);

  if (!mpu.begin()) {
    Serial.println("MPU6050 not found!");
    while (1);
  }

  Serial.println("MPU6050 initialized");
}

void loop() {
  sensors_event_t a, g, temp;
  mpu.getEvent(&a, &g, &temp);

  Serial.print("Accel X: "); Serial.print(a.acceleration.x);
  Serial.print(" Y: "); Serial.print(a.acceleration.y);
  Serial.print(" Z: "); Serial.println(a.acceleration.z);

  Serial.print("Gyro X: "); Serial.print(g.gyro.x);
  Serial.print(" Y: "); Serial.print(g.gyro.y);
  Serial.print(" Z: "); Serial.println(g.gyro.z);

  delay(500);
}
📊 Output Explanation
- Accelerometer values → motion & tilt detection
- Gyroscope values → angular rotation
- Data is displayed on Serial Monitor (115200 baud)
🔧 Common Applications
MPU6050 with ESP32 is widely used in:
- Self-balancing robots
- Gesture-controlled systems
- Drones & flight controllers
- Motion detection alarms
- IoT health & fitness devices
- Smart wearables
⚠️ Common Problems & Fixes
MPU6050 not detected?
- Check SDA/SCL connections
- Confirm 3.3V supply
- Run I2C scanner sketch
Data looks noisy?
- Sensor calibration needed
- Use filters (Kalman / Complementary)
❓ Frequently Asked Questions
Does MPU6050 work with ESP32?
Yes, MPU6050 works perfectly with ESP32 using I2C communication.
Is MPU6050 analog or digital?
It is a digital sensor using I2C protocol.
Can I use MPU6050 for robotics projects?
Absolutely. It is widely used in balancing robots and motion tracking.
Do I need external power?
No, ESP32’s 3.3V pin is sufficient.
🚀 Conclusion
Using MPU6050 with ESP32 opens endless possibilities in robotics and IoT projects. With simple wiring and a few lines of code, you can measure motion, orientation, and rotation accurately.
This project is ideal for students, hobbyists, and professionals building real-world embedded systems.
🧾 What Can It Measure?
| Sensor | Measures | Unit |
|---|---|---|
| Accelerometer | Acceleration on X, Y, Z | m/s² or g |
| Gyroscope | Rotation on X, Y, Z axes | °/sec |
| DMP | Calculates pitch, roll, yaw | Degrees |
🔧 Applications of MPU6050 Sensor
The MPU6050 sensor is widely used in:
- Self-balancing robots
- Gesture-controlled robots
- Drones and flight controllers
- Motion detection systems
- Robotics & IoT projects
- Gaming controllers
- Smart wearables
🧰 Components Required
| Component | Description |
|---|---|
| ESP32 Board | (Any Devkit) |
| MPU6050 Module | GY-521 or equivalent |
| Jumper Wires | Male-to-female preferred |
| Arduino IDE | With libraries installed |
MPU6050 works with 3.3V and 5V, but use 3.3V for safety with ESP32.


Leave a Reply
You must be logged in to post a comment.