

16Dec
Digital Temperature Monitoring: ESP32 + DS18B20 Sensor System
🌡️ What is DS18B20?
The DS18B20 is a digital temperature sensor from Maxim Integrated (now Analog Devices), known for:
✅ Accurate temperature readings
✅ Unique 64-bit serial code (for multiple sensors on one wire)
✅ 1-Wire interface (needs only 1 data line + GND + VCC)
✅ Waterproof versions available
📋 Key Features
| Feature | Description |
|---|---|
| Temperature Range | -55°C to +125°C |
| Accuracy | ±0.5°C (from -10°C to +85°C) |
| Interface | 1-Wire digital |
| Resolution | Programmable: 9 to 12 bits |
| Voltage | 3.0V to 5.5V |
| ID Address | Each sensor has a unique ID |
🧰 Components Used
| Component | Description |
|---|---|
| ESP32 Dev Board | Microcontroller |
| DS18B20 Sensor | Waterproof or standard TO-92 version |
| 4.7kΩ Resistor | Pull-up resistor for 1-Wire |
| Jumper Wires | For connections |
| Breadboard (opt.) | For prototyping |
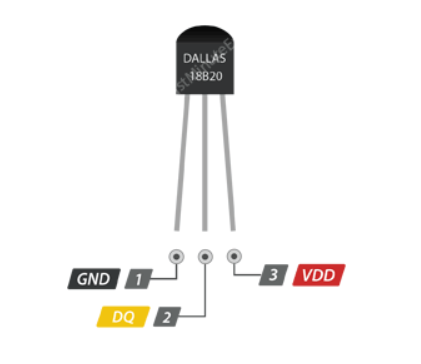
🔌 DS18B20 Pinout and ESP32 Wiring
| DS18B20 Pin | Wire Color (usually) | Connect to ESP32 | Description |
|---|---|---|---|
| VCC | Red | 3.3V or 5V | Power |
| GND | Black | GND | Ground |
| DQ (Data) | Yellow | GPIO 15 (example) | 1-Wire Data |
🔧 Add a 4.7kΩ resistor between VCC and DQ.
VCC | | [4.7kΩ] | DQ --------+-------- GPIO 15 (1-Wire pin) | GND
🧩 Step-by-Step in Arduino IDE
📚 Step 1: Install Required Libraries
- Open Arduino IDE
- Go to Sketch > Include Library > Manage Libraries
- Search and install:
OneWireby Paul StoffregenDallasTemperatureby Miles Burton
🎯 Applications of DS18B20
| Application | Use Case Example |
|---|---|
| 🏠 Home Automation | Room/ambient temperature |
| 🚰 Water Monitoring | Check water heater/cooler |
| 🌿 Agriculture | Soil/environmental sensing |
| 🔥 Fire Detection | Overheat alert in machines |
| 🐢 Aquarium Monitoring | Check fish tank or pet enclosures |
🛠️ Troubleshooting
| Problem | Fix |
|---|---|
| Reading -127.00 °C | Sensor not connected or wrong pin |
| Output always 0.00 °C | Missing pull-up resistor |
| Sensor not detected | Use .getDeviceCount() to debug |
| Multiple sensors issue | Use .getAddress() with sensor ID |
HOW TO OPERATE

#include <OneWire.h>

#include <DallasTemperature.h>

#define DATA 2


void setup() {
 Serial.begin(9600);
}

void loop() {
 int TEMP;
 TEMP=analogRead(DATA);
 Serial.print(TEMP);
 Serial.println();

}


Leave a Reply
You must be logged in to post a comment.