

12Dec
ESP32 with Ultrasonic Sensor (HC-SR04)
🧠 What is an Ultrasonic Sensor?
An ultrasonic sensor is a device that uses sound waves to detect how far something is.
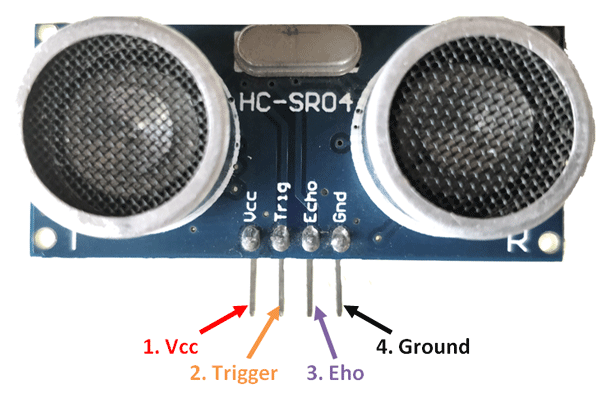
🧩 HC-SR04 Ultrasonic Sensor: Pinout and Function
The HC-SR04 sensor has 4 pins:
| Pin | Name | Function |
|---|---|---|
| 1 | VCC | Power supply (+5V) |
| 2 | Trig | Trigger pin – sends sound |
| 3 | Echo | Echo pin – receives sound |
| 4 | GND | Ground (0V) |
🔌 Pin Details and Use:
- VCC: Connect to +5V from your microcontroller or Arduino.
- GND: Connect to ground (GND).
- Trig (Trigger):
- You send a short pulse (about 10 microseconds) to this pin.
- This starts the sound wave.
- Echo:
- This pin goes HIGH (on) when the echo is being received.
- You measure how long it’s HIGH to calculate distance.
📏 Connection Example with ESP32:
| HC-SR04 Pin | Arduino Pin |
|---|---|
| VCC | 5V |
| GND | GND |
| Trig | D5 (example) |
| Echo | D18 (example) |
🧪 Basic Working Flow:
- Set Trig HIGH for 10 microseconds.
- Then wait for the Echo pin to go HIGH and back to LOW.
- Measure the time it stays HIGH.
- Calculate the distance using the formula:
Distance=(Speed of Sound×Time)/2
(Speed of sound in air ≈ 343 meters/second)
💡 Where It’s Used:
- Robots (to avoid hitting things)
- Cars (reverse parking sensors)
- Water tanks (to check water level)
- Automatic doors
BASIC CODE WITH ESP32
#include <LiquidCrystal_I2C.h>

// ---------------------------------------------------------------------------
// Example NewPing library sketch that does a ping about 20 times per second.
// ---------------------------------------------------------------------------

#include <NewPing.h>

#define TRIGGER_PIN  5  // Arduino pin tied to trigger pin on the ultrasonic sensor.
#define ECHO_PIN     18  // Arduino pin tied to echo pin on the ultrasonic sensor.
#define MAX_DISTANCE 200 // Maximum distance we want to ping for (in centimeters). Maximum sensor distance is rated at 400-500cm.

NewPing sonar(TRIGGER_PIN, ECHO_PIN, MAX_DISTANCE); // NewPing setup of pins and maximum distance.

void setup() {
  Serial.begin(115200); // Open serial monitor at 115200 baud to see ping results
}

void loop() {
  delay(500);                     // Wait 50ms between pings (about 20 pings/sec). 29ms should be the shortest delay between pings.
  Serial.print("Ping: ");
  int d=sonar.ping_cm();
  Serial.print(d); // Send ping, get distance in cm and print result (0 = outside set distance range)
  Serial.println("cm");
}
HOW TO OPERATE USING BLYNK
#define BLYNK_TEMPLATE_ID
#define BLYNK_TEMPLATE_NAME
#define BLYNK_AUTH_TOKEN


#include <WiFi.h>
#include <WiFiClient.h>
#include <BlynkSimpleEsp32.h>


char ssid[] = "Airtel_ramn_7888";  //wifi name
char pass[] = "air45914";  //wifi password


BlynkTimer timer; // Creating a timer object
// ---------------------------------------------------------------------------
// Example NewPing library sketch that does a ping about 20 times per second.
// ---------------------------------------------------------------------------

#include <NewPing.h>

#define TRIGGER_PIN  5  // Arduino pin tied to trigger pin on the ultrasonic sensor.
#define ECHO_PIN     18  // Arduino pin tied to echo pin on the ultrasonic sensor.
#define MAX_DISTANCE 200 // Maximum distance we want to ping for (in centimeters). Maximum sensor distance is rated at 400-500cm.


NewPing sonar(TRIGGER_PIN, ECHO_PIN, MAX_DISTANCE); // NewPing setup of pins and maximum distance.


void setup() {

  Serial.begin(115200); // Open serial monitor at 115200 baud to see ping results.
   Serial.println("Device Started");
   timer.setInterval(1000L, myData); //Staring a timer
   Blynk.begin(BLYNK_AUTH_TOKEN,ssid,pass);

}

void loop() {

  Blynk.run();
  timer.run();
}
void myData() // This loop defines what happens when timer is triggered
{
                    // Wait 50ms between pings (about 20 pings/sec). 29ms should be the shortest delay between pings.
  Serial.print("Ping: ");
  int d=sonar.ping_cm();
  Serial.println(d);
  Blynk.virtualWrite(V0,d);
  delay(2000);

}

Leave a Reply
You must be logged in to post a comment.