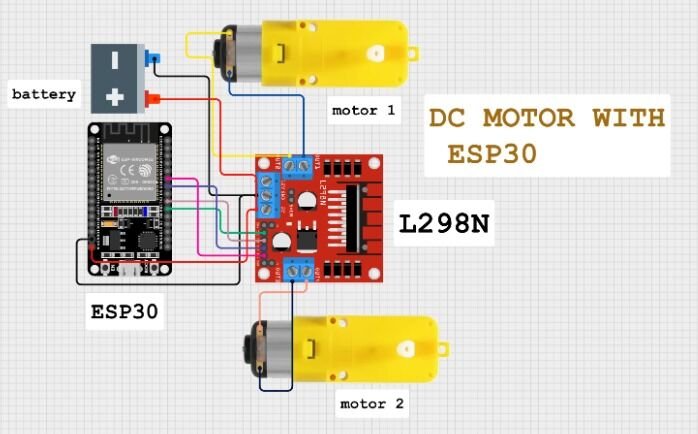
Connect battery pack positive to +12V terminal on L298N.
Connect battery pack negative to GND on L298N.
Remove the jumper on L298N between +12V and 5V(important! Use external 5V for ESP32).
Use buck converter (recommended) to step down 11.1V to 5V and power ESP32 through 5V and GND.
✅ L298N to Motors:
Connect:
Motor A terminals (OUT1 & OUT2) to Left motor.
Motor B terminals (OUT3 & OUT4) to Right motor.
✅ L298N to ESP32 (Control Pins):
ESP32 GPIO
L298N IN Pin
GPIO 16
IN1
GPIO 17
IN2
GPIO 18
IN3
GPIO 19
IN4
HOW TO OPERATE BOT
#include<BluetoothSerial.h>#include<L298NX2.h>#defineLED_BUILTIN 2//-------------L298---------------------------------------------------// motor 1 settings#defineENA 4 // this pin must be PWM enabled pin if Arduino board is used#defineIN_1 16 //rx2#defineIN_2 17 //tx2// motor 2 settings#defineENB 5 // this pin must be PWM enabled pin if Arduino board is used#defineIN_3 18 //d18#defineIN_4 19 //d19//L298NX2 mybot(IN_1,IN_2,IN_3,IN_4); //for full speedL298NX2 mybot(ENA, IN_1, IN_2, ENB, IN_3, IN_4); //for speed//---------BT--------------------BluetoothSerial EspBT;//------Bluetooth RC Controller Define ----#defineback_light 21 //D21#definefront_light 22 //D22#definehorn_Buzz 26 //D26char bdata; //for bluetooth command storevoidsetup(){Serial.begin(9600);Serial.println(F("init"));EspBT.begin("BT_MSKCAR2025_01"); //custom pins for light and buzzerpinMode(LED_BUILTIN, OUTPUT);pinMode(back_light, OUTPUT);pinMode(front_light, OUTPUT);pinMode(horn_Buzz, OUTPUT); //testingmybot.setSpeed(100);mybot.forward();delay(100);mybot.stop(); //test done}//-----------------------------------------voidloop(){while(EspBT.available()>0){ bdata =EspBT.read();Serial.println(bdata);//make condition based on BLE dataswitch(bdata){case'F':Serial.println("Forward");mybot.forward();break;case'B':Serial.println("Reverse");mybot.backward();break;case'L':Serial.println("Left");mybot.forwardA();mybot.backwardB();break;case'R':Serial.println("Right");mybot.forwardB();mybot.backwardA();break;case'S':Serial.println("Stop");mybot.stop();break;case'0':Serial.println("Stop");mybot.stop();break;case'3':Serial.println("LOW speed");mybot.setSpeed(100);break;case'5':Serial.println("Mid speed");mybot.setSpeed(150);break;case'9':Serial.println("Mid speed");mybot.setSpeed(255);break;}}}
IntroductionThe ESP32 is a powerful and versatile microcontroller that has gained immense popularity due to its low cost, high performance,... Read More
ESP32 with 2-Channel Relay Module: A Beginner's GuideIntroductionThe ESP32 is a powerful microcontroller that has gained immense popularity due to... Read More
The ESP32 HW-138 4 Touch Control System is a modern capacitive touch-based control solution that replaces traditional mechanical switches. Using... Read More
AdXL337 and ESP32: A Dynamic Duo for Accelerometer-Based ApplicationsIntroductionThe AdXL337 is a low-power, three-axis accelerometer capable of measuring acceleration along... Read More
🔧 What is an Analog Joystick?An analog joystick typically has:2 potentiometers (one for X-axis, one for Y-axis)1 push button (built-in, press down... Read More
Comprehensive GuideIntroductionStepper motors are a type of electric motor that moves in discrete steps, making them ideal for precise positioning... Read More
ESP32 Joystick Controlled Robot Using ESP-NOW Protocol & L298N Motor DriverWireless bot control with speed adjustment via joystick tilt📝 IntroductionIn... Read More


Leave a Reply
You must be logged in to post a comment.