

15Dec
ESP32-Based Autonomous Fire Extinguisher Bot
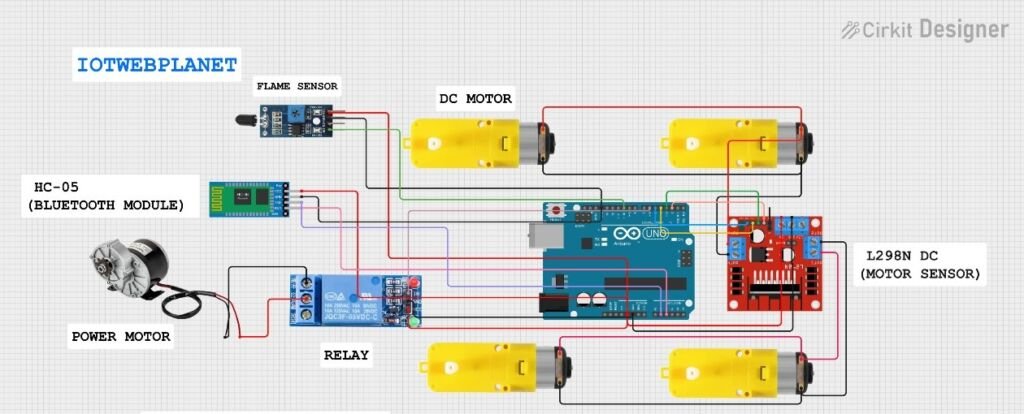
🔥 FIRE BOT – Bluetooth Controlled Fire Extinguisher Robot
Welcome to the FIRE BOT project! This robot is designed to detect and extinguish small fires using a flame sensor and a water pump. It is fully controllable via Bluetooth, making it ideal for educational or experimental firefighting applications.
🧠 Features
- 🔥 Flame detection
- 💧 Water pump activation
- 🎮 Bluetooth remote control (with mobile app)
- 🛞 Motor movement: Forward, Reverse, Left, Right
- 🔁 Servo motor to aim the water spray
- 🧪 Manual + Automatic mode supported
📦 Hardware Used
- Arduino Uno (or compatible board)
- L298N Dual H-Bridge Motor Driver
- 2 DC Motors (for movement)
- Bluetooth module (HC-05/HC-06)
- Flame sensor
- Water pump
- Servo motor (SG90 recommended)
- Power source (Li-ion battery pack or similar)
- Jumper wires and chassis
📜 Arduino Code Breakdown
#include <Servo.h>
#include <L298NX2.h>
#define LED_BUILTIN 2
Servo.h: Controls the servo motor.L298NX2.h: Custom library to control two motors via L298N.LED_BUILTIN: Unused, default Arduino LED.
🧩 Pin Definitions
#define IN_1 2
#define IN_2 3
#define IN_3 4
#define IN_4 5
#define F1 10
#define PUMP 6
#define SERVO 9
| Component | Arduino Pin | Description |
|---|---|---|
| Motor A | 2, 3 | L298N IN1 & IN2 |
| Motor B | 4, 5 | L298N IN3 & IN4 |
| Pump Relay | 6 | Controls water pump |
| Servo Motor | 9 | Spray aiming |
| Flame Sensor | 10 | Input from flame sensor |
🚀 Setup Function
void setup() {
myservo.attach(SERVO);
Serial.begin(9600);
pinMode(PUMP, OUTPUT);
pinMode(F1, INPUT);

// Motor & Pump Test
mybot.forward();
delay(5000);
mybot.stop();
mybot.backward();
delay(5000);
mybot.stop();

myservo.write(90); // center
delay(1000);
myservo.write(180); // right
digitalWrite(PUMP, HIGH); // test spray
}

Initializes serial, servo, motors, and flame sensor.

Performs a full functional test at startup.
🔄 Main Loop
Flame Detection (Optional Auto Mode)
f1 = digitalRead(F1); Serial.print(f1);
Optional logic for auto mode:


if (f1 == 1)
 digitalWrite(PUMP, HIGH);
 else
digitalWrite(PUMP, LOW);
Uncomment for automatic spraying based on flame sensor.🔗 Bluetooth Command Handling
while (Serial.available() > 0)
{
bdata = Serial.read();
switch (bdata) {
...
}
}📱 Bluetooth Commands
| Command | Action | Description |
|---|---|---|
F | Move Forward | Both motors move forward |
B | Move Backward | Both motors move backward |
L | Turn Left | Left spin using motor logic |
R | Turn Right | Right spin using motor logic |
S | Stop | Stops all motors |
V | Pump ON | Activates pump to spray water |
v | Pump OFF | Turns off the pump |
W | Servo Move Right | Servo rotates from 0 to 90 |
w | Servo Move Left | Servo rotates back from 90 to 0 |
🖼️ How It Works
- Use a Bluetooth app (like “Bluetooth RC Controller”) to send commands.
- The robot responds with motor control, pump activation, and servo aiming.
- Optionally, the flame sensor detects fire and triggers the pump automatically.
HOW TO OPERATE

#include <Servo.h>
#include <L298NX2.h>

#define LED_BUILTIN 2

//-------------L298---------------------------------------------------
// Motor 1 settings
#define IN_1 2 //rx2
#define IN_2 3 //tx2

// Motor 2 settings
#define IN_3 4 //d4
#define IN_4 5 //d5

#define F1 10


L298NX2 mybot(IN_1, IN_2, IN_3, IN_4); // for full speed


//---------Bluetooth RC Controller Define----
#define PUMP 6   //D6
#define SERVO 9  //D9


char bdata; // for bluetooth command store

Servo myservo;
int f1;

void setup() {
  myservo.attach(SERVO);
  Serial.begin(9600);


  pinMode(PUMP, OUTPUT);
  pinMode(F1, INPUT);


  // Testing
  mybot.forward();
  delay(5000);
  mybot.stop();
  mybot.backward();
  delay(5000);
  mybot.stop();
  myservo.write(90);
  delay(1000);
  myservo.write(180);
  digitalWrite(PUMP, HIGH);
  // Test done
}

void loop() {
  f1 = digitalRead(F1);


  Serial.print(f1);
  Serial.print("\t");

//  if automatic then remove comment

  // if (f1 == 1)
  //   digitalWrite(PUMP, HIGH);
  // else
  //   digitalWrite(PUMP, LOW);


  while (Serial.available() > 0) {
    bdata = Serial.read();
    Serial.println(bdata);

    // Make condition based on BLE data
    switch (bdata) {
      case 'F':
        Serial.println("Forward");
        mybot.forward();
        break;

      case 'B':
        Serial.println("Reverse");
        mybot.backward();
        break;

      case 'L':
        Serial.println("Left");
        mybot.forwardA();
        mybot.backwardB();
        break;

      case 'R':
        Serial.println("Right");
        mybot.forwardB();
        mybot.backwardA();
        break;

      case 'S':
        Serial.println("Stop");
        mybot.stop();
        break;

      case 'V':
        Serial.println("PUMP ON");
        digitalWrite(PUMP, HIGH);
        break;

      case 'v':
        Serial.println("PUMP LOW");
        digitalWrite(PUMP, LOW);
        break;

      case 'W':
        Serial.println("SERVO MOVE");
        for (int pos = 0; pos < 90; pos++)
          myservo.write(pos);
        break;

      case 'w':
        Serial.println("SERVO BACK");
        for (int pos = 90; pos >= 0; pos--)
          myservo.write(pos);
        break;
    }
  }
}

Leave a Reply
You must be logged in to post a comment.