


ESP-NOW ESP32: Powerful Wireless Communication Tutorial with Keypad & NeoPixel
What is ESP-NOW ESP32?
ESP-NOW ESP32 is widely used in offline IoT projects where fast, reliable, and low-power communication is required. Using ESP-NOW ESP32, multiple ESP32 boards can communicate directly without depending on Wi-Fi routers or cloud servers, making ESP-NOW ESP32 ideal for real-time control systems and battery-operated devices.
👉 ESP-NOW works on top of the 2.4 GHz Wi-Fi radio, but does not require Wi-Fi connection.
Key Features of ESP-NOW ESP32
- 📡 Peer-to-peer communication (up to 20 devices)
- ⚡ Ultra-fast transmission (few milliseconds delay)
- 🔋 Low power consumption
- 🔐 Encrypted data support
- 🚫 No router or internet required
- 🔁 Bi-directional communication
- 📦 Supports broadcast & unicast
Where to Use ESP-NOW (Use Cases)
ESP-NOW is perfect when you need local, fast, and reliable communication.
Popular Applications
- 🎮 Wireless joystick or game controller
- 🏠 Smart home automation (offline control)
- 🚨 Personal safety & alert devices (like Safeguard+)
- 🌱 Remote environmental sensors
- 🚗 Vehicle-to-vehicle (V2V) communication
- 🔋 Battery-powered remotes
- 🎓 College, IEEE & hackathon projects
Components Required
- ✅ 2 × ESP32 boards
- ✅ Micro-USB cables
- ✅ Arduino IDE (latest version)
- ✅ Input device (4×4 Keypad / Button / Joystick)
- ✅ Output device (NeoPixel / LED / Buzzer / OLED)
How ESP-NOW Works (Internals)
- ESP32 uses Wi-Fi in STA (Station) mode
- One ESP32 acts as Sender, the other as Receiver
- Data is packed in a struct
- Data is transmitted using MAC Address
- Receiver decodes data using a callback function
📌 Important Notes
- Both ESP32 must be on the same Wi-Fi channel
- Packet size must be < 250 bytes
- ESP-NOW does NOT support HTTP / MQTT / IP networking
ESP32 Pinout Configuration
🔢 Sender Side – 4×4 Keypad Pinout
| Keypad Pin | ESP32 GPIO |
|---|---|
| R1 | GPIO 19 |
| R2 | GPIO 18 |
| R3 | GPIO 5 |
| R4 | GPIO 17 |
| C1 | GPIO 16 |
| C2 | GPIO 4 |
| C3 | GPIO 22 |
| C4 | GPIO 15 |
💡 Receiver Side – NeoPixel Pinout
| NeoPixel Pin | ESP32 Pin |
|---|---|
| VCC | VCC |
| GND | GND |
| DOUT | GPIO 15 |
How to Check ESP32 MAC Address
Every ESP32 has a unique MAC address, which is required for ESP-NOW communication.
Use the following code to find it:
#include <WiFi.h>
#include <esp_wifi.h>

void readMacAddress(){
  uint8_t baseMac[6];
  if (esp_wifi_get_mac(WIFI_IF_STA, baseMac) == ESP_OK) {
    Serial.printf("%02x:%02x:%02x:%02x:%02x:%02x\n",
                  baseMac[0], baseMac[1], baseMac[2],
                  baseMac[3], baseMac[4], baseMac[5]);
  }
}

void setup(){
  Serial.begin(115200);
  WiFi.mode(WIFI_STA);
  Serial.print("ESP32 MAC Address: ");
  readMacAddress();
}

void loop(){}
ESP-NOW Sender Code (Keypad → ESP32)
#include <esp_now.h>
#include <WiFi.h>
#include <Keypad.h>

const byte ROWS = 4;
const byte COLS = 4;

char keys[ROWS][COLS] = {
  {'1','2','3','A'},
  {'4','5','6','B'},
  {'7','8','9','C'},
  {'*','0','#','D'}
};

byte rowPins[ROWS] = {19,18,5,17};
byte colPins[COLS] = {16,4,22,15};

Keypad keypad = Keypad(makeKeymap(keys), rowPins, colPins, ROWS, COLS);

// Receiver MAC Address
uint8_t receiverAddress[] = {0x30,0xC6,0xF7,0x22,0xEB,0xD8};

typedef struct struct_message {
  char a[32];
} struct_message;

struct_message myData;
esp_now_peer_info_t peerInfo;
String inputBuffer = "";

void OnDataSent(const uint8_t *mac, esp_now_send_status_t status) {
  Serial.println(status == ESP_NOW_SEND_SUCCESS ? "Sent" : "Failed");
}

void setup() {
  Serial.begin(115200);
  WiFi.mode(WIFI_STA);

  esp_now_init();
  esp_now_register_send_cb(OnDataSent);

  memcpy(peerInfo.peer_addr, receiverAddress, 6);
  peerInfo.channel = 0;
  peerInfo.encrypt = false;
  esp_now_add_peer(&peerInfo);
}

void loop() {
  char key = keypad.getKey();
  if(key){
    if(key == '#'){
      inputBuffer.toCharArray(myData.a, sizeof(myData.a));
      esp_now_send(receiverAddress, (uint8_t*)&myData, sizeof(myData));
      inputBuffer="";
    }
    else if(key=='*'){
      inputBuffer="";
    }
    else{
      inputBuffer+=key;
    }
    delay(300);
  }
}
ESP-NOW Receiver Code (NeoPixel Control)
#include <esp_now.h>
#include <WiFi.h>
#include <Adafruit_NeoPixel.h>

#define PIN 15
#define PIXELS 4

Adafruit_NeoPixel strip(PIXELS, PIN, NEO_GRB + NEO_KHZ800);

typedef struct struct_message {
  char a[32];
} struct_message;

struct_message myData;

void OnDataRecv(const uint8_t * mac, const uint8_t *incomingData, int len) {
  memcpy(&myData, incomingData, sizeof(myData));
  strip.clear();

  if(strcmp(myData.a,"1")==0) strip.setPixelColor(1, strip.Color(255,0,0));
  if(strcmp(myData.a,"2")==0) strip.setPixelColor(2, strip.Color(0,255,0));
  if(strcmp(myData.a,"3")==0) strip.setPixelColor(3, strip.Color(0,0,255));
  if(strcmp(myData.a,"23")==0) strip.setPixelColor(3, strip.Color(0,255,255));

  strip.show();
}

void setup() {
  Serial.begin(115200);
  strip.begin();
  WiFi.mode(WIFI_STA);
  esp_now_init();
  esp_now_register_recv_cb(OnDataRecv);
}

void loop(){}
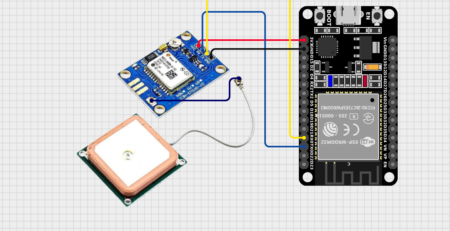
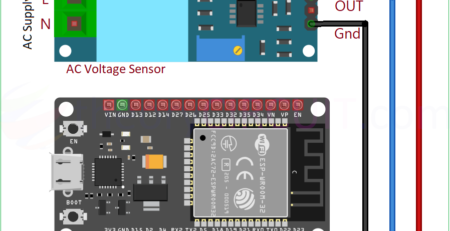
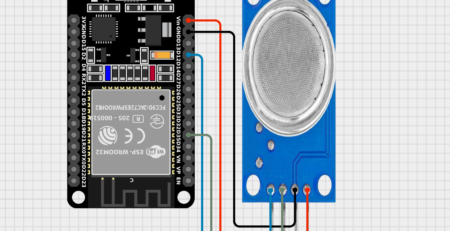
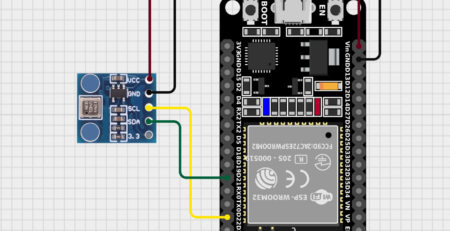
Circuit Diagram
ESP-NOW Protocol on ESP32
.png)
Advantages of ESP-NOW ESP32 Over Wi-Fi & Bluetooth
| Feature | ESP-NOW | Wi-Fi | Bluetooth |
|---|---|---|---|
| Internet | ❌ | ✅ | ❌ |
| Latency | Very Low | High | Medium |
| Power | Low | High | Low |
| Setup | Simple | Complex | Medium |
Conclusion
ESP-NOW ESP32 is one of the most powerful wireless communication technologies available for ESP32 boards, especially when low latency and offline operation are required.
Espressif Official ESP-NOW Documentation
https://docs.espressif.com/projects/esp-idf/en/latest/esp32/api-reference/network/esp_now.html

Leave a Reply
You must be logged in to post a comment.