

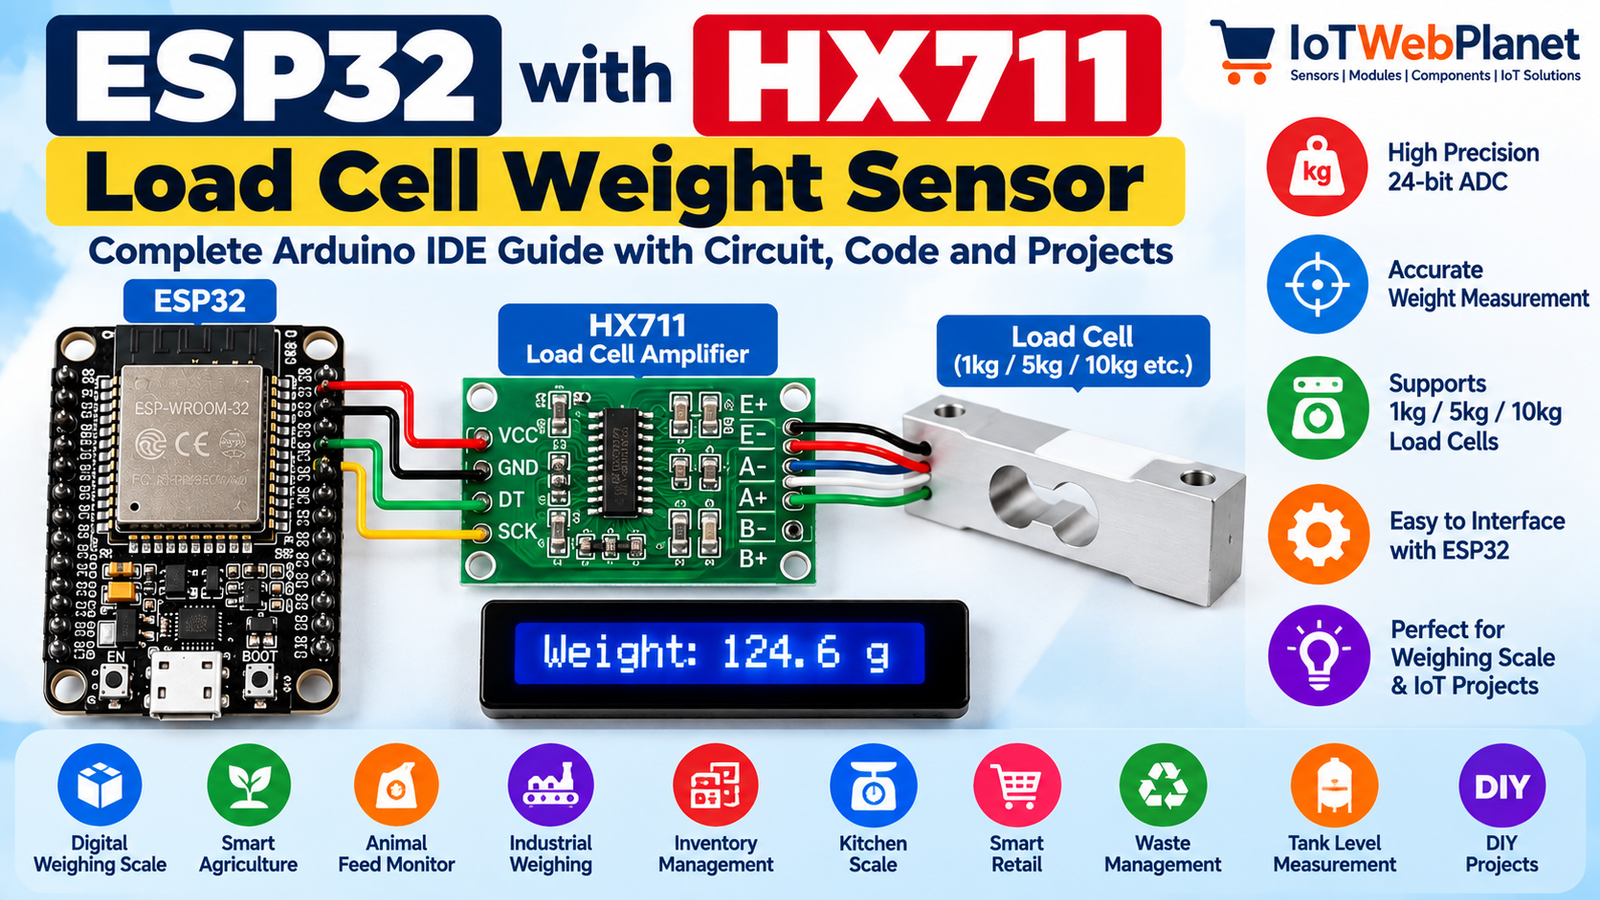
ESP32 with HX711 Load Cell Amplifier – Digital Weighing Scale Guide
The HX711 module is a compact 24-bit precision analog-to-digital converter and load-cell amplifier designed for electronic weighing projects. Paired with an ESP32 and a strain-gauge load cell, it lets you build accurate digital scales, IoT inventory monitors, smart bins and force-measurement systems.
SEO Details
- SEO title: ESP32 with HX711 Load Cell Amplifier – Digital Weighing Scale Guide
- Slug: esp32-hx711-load-cell-weight-sensor
- Meta description: Learn how to connect HX711 load cell amplifier with ESP32 to measure weight. Includes wiring, Arduino code, calibration, troubleshooting and project ideas.
- Focus keyword: ESP32 HX711 Load Cell
- Secondary keywords: HX711 ESP32, ESP32 weighing scale, load cell ESP32, weight sensor ESP32, HX711 Arduino IDE
What is the HX711 Module?
The IoTWebPlanet HX711 Module (SKU IWP-00753) is a load-cell amplifier breakout using the HX711 24-bit ADC. The product listing specifies two analog input channels, an integrated programmable-gain amplifier, a two-wire Clock/Data interface, 10/80 Hz refresh rate, 2.7–5 VDC operation, less than 10 mA operating current and a compact 24 × 16 mm board.
Components Required
- HX711 Module – Buy from IoTWebPlanet
- ESP32 30-pin development board
- 4-wire load cell (1 kg, 5 kg or suitable capacity)
- Jumper wires
- USB cable
- A rigid weighing platform for practical calibration
Key Features and Specifications
| ADC resolution | 24 bit |
| Input | Differential, ±40 mV full scale (listing) |
| Channels | 2 analog input channels |
| Programmable gain | Up to 128× |
| Interface | Two-wire Clock + Data |
| Refresh rate | 10 / 80 Hz |
| Operating voltage | 2.7–5 VDC |
| Operating current | <10 mA |
| Board size | 24 × 16 mm |
Why Use HX711 with ESP32?
A load cell produces a very small differential voltage that cannot be measured reliably by a normal ESP32 GPIO alone. The HX711 amplifies this signal and converts it into a high-resolution digital value. The ESP32 can then calibrate the reading into grams or kilograms and use Wi-Fi/Bluetooth to log or transmit weight data.
ESP32 to HX711 Wiring
| HX711 Pin | ESP32 30-pin | Purpose |
|---|---|---|
| VCC | 3.3V | Module power |
| GND | GND | Common ground |
| DT / DOUT | GPIO 19 | HX711 data output |
| SCK / CLK | GPIO 18 | HX711 clock |
Connect the four load-cell wires to the HX711 bridge terminals according to the markings on your particular load cell/HX711 board (commonly E+, E−, A+ and A−). Wire colours are not universal, so use the supplied load-cell documentation rather than relying only on colour.
Fritzing-Style Circuit Diagram
          ESP32 30-PIN                 HX711                    LOAD CELL
       ┌────────────────┐          ┌────────────┐             ┌────────────┐
 3.3V  ●──────────────────────────►│ VCC        │             │            │
 GND   ●──────────────────────────►│ GND        │             │  Strain    │
GPIO19 ●◄──────────────────────────│ DT/DOUT    │             │  Gauge     │
GPIO18 ●──────────────────────────►│ SCK/CLK    │             │            │
       └────────────────┘          │            │             │            │
                                   │ E+ ─────────────────────►│ Excitation+│
                                   │ E- ─────────────────────►│ Excitation-│
                                   │ A+ ◄─────────────────────│ Signal+    │
                                   │ A- ◄─────────────────────│ Signal-    │
                                   └────────────┘             └────────────┘
Required Arduino Library
In Arduino IDE Library Manager install HX711 Arduino Library by Bogdan Necula (the commonly used bogde HX711 API). The example below uses HX711.h.
Complete ESP32 + HX711 Arduino IDE Code
#include <Arduino.h>
#include "HX711.h"

#define HX711_DOUT 19
#define HX711_SCK  18

HX711 scale;

// Replace after calibration.
// The sign may need to be reversed depending on load-cell wiring.
float calibrationFactor = -7050.0;

void setup() {
  Serial.begin(115200);
  delay(1000);

  Serial.println();
  Serial.println("IoTWebPlanet - ESP32 + HX711");

  scale.begin(HX711_DOUT, HX711_SCK);

  if (!scale.wait_ready_timeout(2000)) {
    Serial.println("HX711 not found. Check wiring.");
    while (true) delay(1000);
  }

  scale.set_scale(calibrationFactor);

  Serial.println("Remove all weight from the scale...");
  delay(2000);

  scale.tare(20);

  Serial.println("Tare complete.");
  Serial.println("Place weight on the load cell.");
}

void loop() {
  if (scale.is_ready()) {
    float weight = scale.get_units(10);

    Serial.print("Weight: ");
    Serial.print(weight, 2);
    Serial.println(" units");
  } else {
    Serial.println("HX711 not ready");
  }

  delay(500);
}
Calibration – Important Before Measuring Weight
The value -7050.0 is only a starting example; every load cell installation requires calibration. Tare the empty platform, place a known reference mass on it, compare the displayed value with the known mass, then adjust calibrationFactor. If adding weight makes the value negative, reverse the calibration-factor sign or check A+/A− wiring. Do not claim gram-level accuracy until your own mechanical setup has been calibrated and repeatability checked.
How the Code Works
scale.begin() assigns GPIO19 to HX711 data and GPIO18 to its clock. wait_ready_timeout() confirms communication, set_scale() applies the calibration factor, and tare() records the unloaded platform as zero. In the loop, get_units(10) averages multiple samples to reduce noise and prints the converted measurement to Serial Monitor.
Expected Serial Monitor Output
IoTWebPlanet - ESP32 + HX711
Remove all weight from the scale...
Tare complete.
Place weight on the load cell.
Weight: 0.01 units
Weight: 0.50 units
Weight: 0.50 units
Weight: 0.51 units
Troubleshooting
- HX711 not found: Check VCC, GND, DOUT and SCK wiring and ensure the module shares ground with ESP32.
- Weight changes in the wrong direction: Reverse the calibration-factor sign or check A+/A− connections.
- Reading drifts: Make sure the load cell is mounted correctly, allow settling time, avoid touching the platform and use stable power.
- Values jump: Keep load-cell wiring away from motors and switching power wires, use averaging and mechanically secure the sensor.
- Wrong weight: Recalibrate using a known reference mass.
- Reading stays near zero: Check bridge wiring and verify that the load is applied in the correct direction.
- ESP32 resets: Inspect the supply and wiring for shorts or unstable power.
15 Practical ESP32 + HX711 Project Ideas
- Wi-Fi digital weighing scale
- IoT kitchen scale
- Smart LPG cylinder weight monitor
- Beehive weight monitoring system
- Smart inventory shelf
- Pet food consumption monitor
- Automatic filling machine
- Parcel weighing station
- Smart waste-bin weight monitor
- Force measurement experiment
- Connected agricultural produce scale
- Liquid-container weight/level estimator
- Warehouse stock monitoring platform
- Automatic ingredient dispensing system
- Cloud-connected load data logger
Frequently Asked Questions
Can HX711 work with ESP32?
Yes. HX711 uses a simple Clock/Data digital interface and the IoTWebPlanet module is specified for 2.7–5 VDC operation, making 3.3 V operation convenient with ESP32.
Why is HX711 needed with a load cell?
A strain-gauge load cell generates a tiny differential signal. HX711 provides amplification and a high-resolution 24-bit ADC so a microcontroller can read that signal effectively.
Can I use a 5 kg load cell?
Yes. Use a compatible four-wire load cell and calibrate the completed mechanical setup for that sensor.
Why does my weight reading show negative values?
The bridge signal polarity or calibration-factor sign is reversed. Swap A+ and A− or reverse the sign of the calibration factor.
How accurate is HX711?
The ADC has 24-bit data resolution, but final weighing accuracy depends on the load cell, mounting, calibration, temperature, electrical noise, power stability and mechanical design.
Conclusion
HX711 is an inexpensive way to add weight and force measurement to ESP32 projects. Its high-resolution ADC, integrated gain and simple two-wire digital interface make it especially useful for connected scales, inventory systems and automation. For best results, pay as much attention to load-cell mounting and calibration as to the electronics.



Leave a Reply
You must be logged in to post a comment.