

12Dec
ESP32 with DHT11 Temperature & Humidity Sensor
📌 What is the DHT11 Sensor?
The DHT11 is a basic, low-cost digital temperature and humidity sensor. It uses a capacitive humidity sensor and a thermistor to measure the surrounding air and outputs a digital signal on the data pin (no analog input needed).
🧠 Key Features of DHT11
| Feature | Details |
|---|---|
| Temperature Range | 0 to 50°C (±2°C accuracy) |
| Humidity Range | 20% to 90% RH (±5% accuracy) |
| Operating Voltage | 3V to 5.5V |
| Signal Type | Digital (single-wire serial) |
| Sampling Rate | 1 Hz (one reading per second) |
| Size | Small and lightweight |
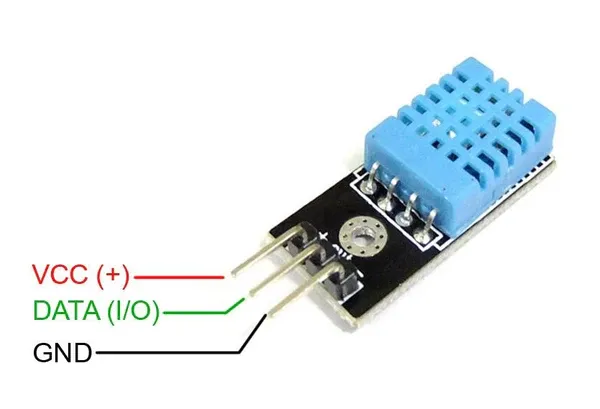
⚙️ Pinout of DHT11 Sensor
| Pin | Name | Description |
|---|---|---|
| 1 | VCC | Power supply (3.3V or 5V) |
| 2 | Data | Serial data output |
| 3 | NC | Not connected |
| 4 | GND | Ground |
(Sometimes it comes in a 3-pin module: VCC, DATA, GND)
📦 How It Works
- Humidity Measurement: It uses a capacitive sensor to measure humidity.
- Temperature Measurement: A thermistor changes resistance with temperature.
- The sensor has a built-in microcontroller that converts analog signals to calibrated digital signals, sent to the microcontroller via one wire.
🧪 Applications of DHT11
- Weather stations
- HVAC systems
- Greenhouse monitoring
- Home automation
- IoT-based climate monitoring
🔗 Basic Example with ESP32
✅ Components Needed
- ESP32
- DHT11 sensor module
- 10kΩ pull-up resistor (if required)
- Jumper wires
- Breadboard
🧾ESP32 Code With DHT11
#include <DHT.h>

#define DHTPIN 2 // Pin where the DHT11 is connected
#define DHTTYPE DHT11 // Define the type of DHT sensor

DHT dht(DHTPIN, DHTTYPE); // Create DHT object

void setup() {
Serial.begin(9600);
dht.begin();
}

void loop() {
float h = dht.readHumidity();
float t = dht.readTemperature(); // Celsius

if (isnan(h) || isnan(t)) {
Serial.println("Failed to read from DHT sensor!");
return;
}

Serial.print("Humidity: ");
Serial.print(h);
Serial.print(" %\t");
Serial.print("Temperature: ");
Serial.print(t);
Serial.println(" °C");

delay(2000); // Wait 2 seconds between readings
}❗ Important Notes
- The DHT11 can only read once every 1 second (slow response rate).
- Use a pull-up resistor (around 10kΩ) between the DATA and VCC lines if needed.
- Avoid long cables to prevent signal degradation.

Leave a Reply
You must be logged in to post a comment.