

19Dec
ESP32 with Gravity Voice Recognition Module
The Gravity Voice Recognition Module is a user-friendly module developed by DFRobot that allows microcontrollers like Arduino or ESP32 to recognize voice commands offline (without internet access). It’s ideal for voice-controlled smart devices, robots, automation systems, and other embedded applications.
🔧 Key Features:
| Feature | Details |
|---|---|
| Offline Voice Recognition | No internet or cloud processing required. |
| Custom Command Training | Can be trained with up to 80 custom commands (user-defined). |
| Predefined Wake Word | Comes with built-in wake words (like “Hello Robot”). |
| Speaker-Independent | Works for most users without personalized training. |
| Communication Interface | Supports both UART and I2C for communication. |
| Language Support | English and Mandarin (depending on firmware version). |
| Compact Design | Small PCB module suitable for embedding in electronics projects. |
🧠 How It Works:
- Wake-Up Mode: Waits for a predefined wake word (like “Hello Robot”).
- Command Recognition: Once awake, it listens for the next spoken command and returns a corresponding ID.
- Command Mapping: The microcontroller receives this ID and triggers actions like turning on lights, moving motors, etc.
📡 Communication Interfaces:
- UART (Serial Communication):
- Default Baud rate:
115200 - Commands are sent/received as bytes or ASCII strings.
- Default Baud rate:
- I2C (For simultaneous multi-module control):
- Default address:
0x64 - Easy integration with other I2C devices like OLED, sensors, etc.
- Default address:
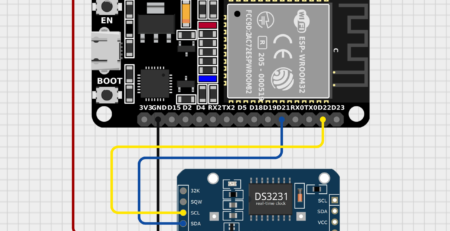
🔌 Typical Connections with Arduino/ESP32:
| Module Pin | Arduino Pin |
|---|---|
| VCC | 5V / 3.3V |
| GND | GND |
| RX | D2 (SoftSerial TX) |
| TX | D3 (SoftSerial RX) |
🧪 Voice Command Training:
- Use the DFRobot voice training software or serial commands to:
- Add/Delete commands
- Set wake-up time
- View recognized command IDs
Example command (in serial):
+train=turn on light
+train=turn off fan
📁 Example Output:
When a command is recognized, the module sends:
+CMD: 01
Where 01 is the command ID previously trained and mapped.
💡 Applications:
- Smart Home Control
- Voice-controlled Robots
- Assistive Technologies
- Touchless Switches
- DIY AI Projects
HOW TO OPERATE

#include "DFRobot_DF2301Q.h"

#define Led 2

//I2C communication
DFRobot_DF2301Q_I2C asr;

void setup() {
  Serial.begin(115200);

  pinMode(Led, OUTPUT);    //Init LED pin to output mode
  digitalWrite(Led, LOW);  //Set LED pin to low

  // Init the sensor
  while (!(asr.begin())) {
    Serial.println("Communication with device failed, please check connection");
    delay(3000);
  }
  Serial.println("Begin ok!");
  /**
   * @brief Set voice volume
   * @param voc - Volume value(1~7)
   */
  // asr.setVolume(4);

  /**
     @brief Set mute mode
     @param mode - Mute mode; set value 1: mute, 0: unmute
  */
  asr.setMuteMode(0);

  /**
     @brief Set wake-up duration
     @param wakeTime - Wake-up duration (0-255)
  */
  asr.setWakeTime(20);

  /**
     @brief Get wake-up duration
     @return The currently-set wake-up period
  */
  uint8_t wakeTime = 0;
  wakeTime = asr.getWakeTime();
  Serial.print("wakeTime = ");
  Serial.println(wakeTime);

  // asr.playByCMDID(1);   // Wake-up command

  /**
     @brief Play the corresponding reply audio according to the ID
     @param CMDID - command word ID
  */
  //asr.playByCMDID(23);  // Command word ID
}

void loop() {
  /**
     @brief Get the ID corresponding to the command word
     @return Return the obtained command word ID, returning 0 means no valid ID is obtained
  */
  uint8_t CMDID = asr.getCMDID();
  switch (CMDID) {
    case 103:                                                  //If the command is “Turn on the light”
      digitalWrite(Led, HIGH);                                 //Turn on the LED
      Serial.println("received'Turn on the light',command flag'103'");  //Serial transmits "received"Turn on the light",command flag"103
      break;

    case 104:                                                  //If the command is “Turn off the light”
      digitalWrite(Led, LOW);                                  //Turn off the LED
      Serial.println("received'Turn off the light',command flag'104'");  //The serial transmits "received"Turn off the light",command flag"104""
      break;

    default:
      if (CMDID != 0) {
        Serial.print("CMDID = ");  //Printing command ID
        Serial.println(CMDID);
      }
  }
  delay(300);
}.png)

Leave a Reply
You must be logged in to post a comment.