

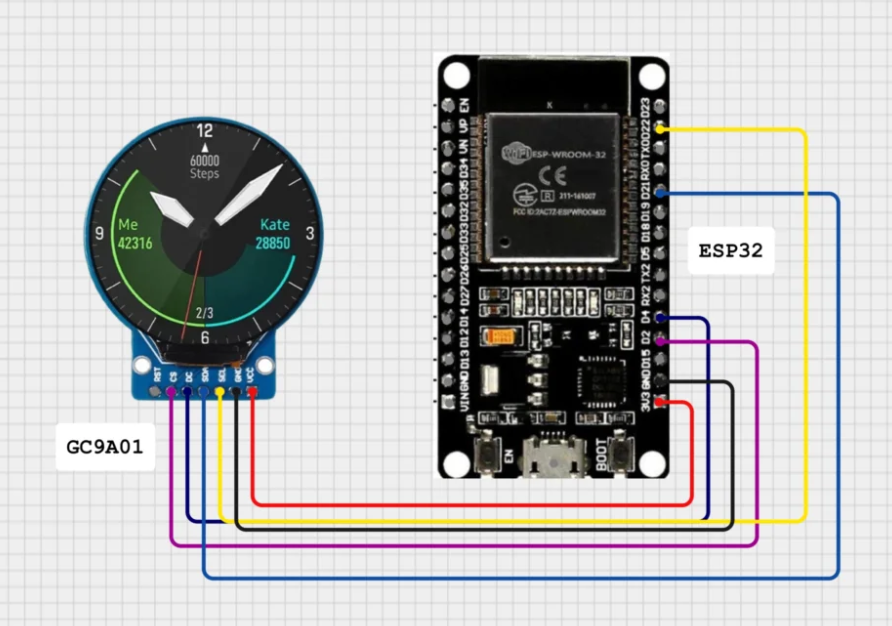
ESP32 with GC9A01 Round TFT Display:
Introduction
The ESP32 GC9A01 TFT display is a powerful color display module widely used in modern embedded electronics projects. Its round design makes it perfect for smartwatch interfaces, digital clocks, IoT dashboards, wearable devices, and compact graphical displays.
In this tutorial, we will learn how to connect the ESP32 GC9A01 TFT display with ESP32, install the required Arduino libraries, configure SPI communication, and display graphics and text using Arduino IDE.
The ESP32 is an excellent microcontroller for this project because it provides:
- High-speed dual-core processing
- Built-in WiFi
- Bluetooth connectivity
- Multiple GPIO pins
- Fast SPI communication
- Low power operation
By combining ESP32 with the ESP32 GC9A01 TFT display, we can create colorful graphical interfaces for IoT and embedded applications.
Project Features
This ESP32 GC9A01 TFT display project can display:
- Text
- Colors
- Shapes
- Graphics
- Sensor values
- Animations
- User interfaces
Applications include:
- ESP32 smartwatch
- IoT monitoring display
- Weather station
- Digital dashboard
- Robotics controller
- Home automation screen
Required Components
| Component | Quantity |
|---|---|
| ESP32 Development Board | 1 |
| GC9A01 1.28 Inch Round TFT Display | 1 |
| Jumper Wires | As required |
| USB Cable | 1 |
| Arduino IDE | 1 |
About GC9A01 Round TFT Display
The GC9A01 is a color TFT display controller designed for small round LCD screens.
Display Specifications
| Feature | Details |
|---|---|
| Display Size | 1.28 inch |
| Resolution | 240 x 240 Pixels |
| Driver IC | GC9A01 |
| Communication | SPI |
| Color | RGB 65K Colors |
| Operating Voltage | 3.3V |
| Interface | SPI |
Required Arduino Libraries
Install these three libraries before uploading the code.
1. Adafruit GFX Library
The Adafruit GFX library provides basic graphics functions.
Features:
- Text display
- Font support
- Lines
- Circles
- Rectangles
- Colors
2. Adafruit GC9A01A Library
This library controls the GC9A01 display driver.
It manages:
- Display initialization
- Pixel communication
- Screen commands
- Color handling
3. SPI Library
SPI is the communication protocol used between ESP32 and GC9A01.
The ESP32 Arduino core already includes this library.
Installing Libraries in Arduino IDE
Open Arduino IDE:
Sketch
   ↓
Include Library
   ↓
Manage Libraries
Search and install:
Adafruit GFX Library
Adafruit GC9A01A
SPI library is already available.
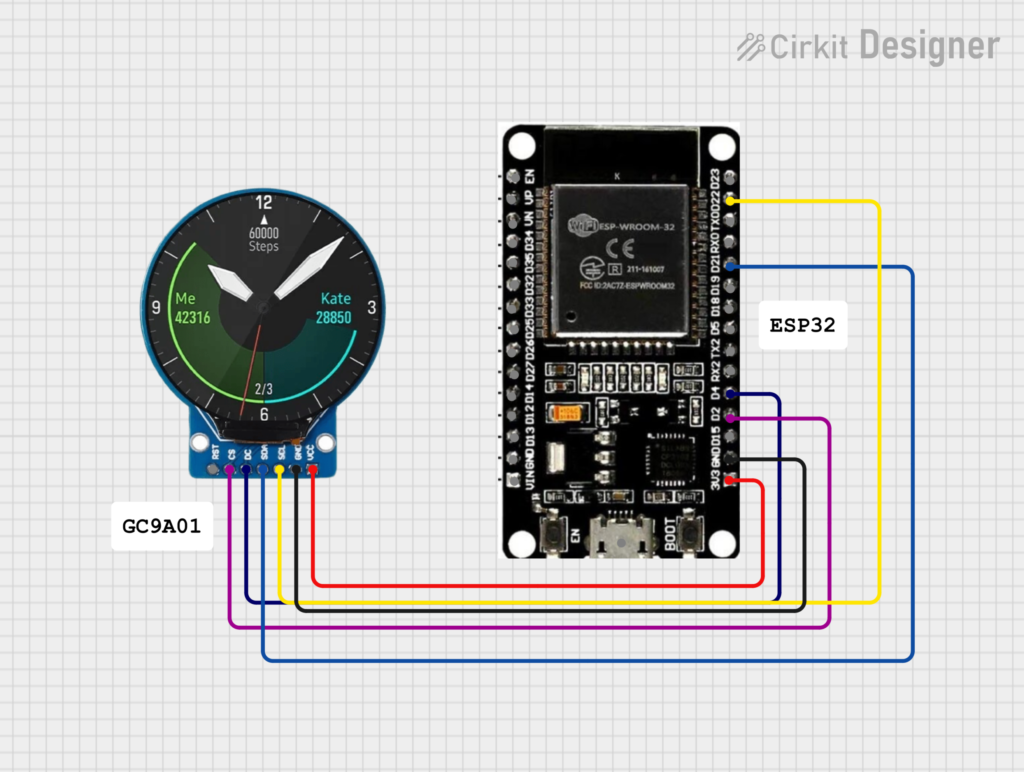
ESP32 to GC9A01 Wiring Connection
The GC9A01 uses SPI communication.
Connection Table
| GC9A01 Pin | ESP32 Pin |
|---|---|
| VCC | 3.3V |
| GND | GND |
| DC | GPIO 4 |
| CS | GPIO 2 |
| SDA / MOSI | GPIO 21 |
| SCL / SCK | GPIO 22 |
| BL / LED | 3.3V |
Pin Definition
In Arduino code we define:
#define TFT_DC 4
#define TFT_CS 2
#define TFT_MOSI 21
#define TFT_SCLK 22
Meaning:
| Function | ESP32 GPIO |
|---|---|
| Data/Command | GPIO 4 |
| Chip Select | GPIO 2 |
| SPI Data | GPIO 21 |
| SPI Clock | GPIO 22 |
Circuit Diagram
Complete ESP32 GC9A01 Arduino Code
#include "SPI.h"
#include "Adafruit_GFX.h"
#include "Adafruit_GC9A01A.h"


#define TFT_CS 2
#define TFT_DC 4

#define TFT_MOSI 21
#define TFT_SCLK 22


Adafruit_GC9A01A tft(TFT_CS, TFT_DC);


void setup()
{
  Serial.begin(115200);

  Serial.println("GC9A01 ESP32 Test");


  SPI.begin(
    TFT_SCLK,
    -1,
    TFT_MOSI,
    TFT_CS
  );


  tft.begin();


  tft.setRotation(0);


  tft.fillScreen(GC9A01A_BLACK);


  tft.setCursor(20,100);

  tft.setTextColor(GC9A01A_GREEN);

  tft.setTextSize(2);

  tft.println("ESP32");


  tft.setCursor(15,130);

  tft.println("GC9A01 TFT");

}


void loop()
{

}
Complete Code Explanation
Including Libraries
#include "SPI.h"
#include "Adafruit_GFX.h"
#include "Adafruit_GC9A01A.h"
These libraries provide:
SPI
Handles communication between ESP32 and TFT.
Adafruit GFX
Provides drawing functions.
GC9A01A
Controls the display hardware.
Defining TFT Pins
#define TFT_CS 2
#define TFT_DC 4
CS Pin
Chip Select activates the TFT display during SPI communication.
Connected to:
ESP32 GPIO 2
DC Pin
Data/Command pin tells the display whether the received information is:
- A command
- Display data
Connected to:
ESP32 GPIO 4
SPI Pin Configuration
#define TFT_MOSI 21
#define TFT_SCLK 22
MOSI
GPIO21 sends data from ESP32 to display.
Used for:
- Text
- Images
- Graphics
SCLK
GPIO22 provides SPI clock timing.
It synchronizes communication.
Creating TFT Object
Adafruit_GC9A01A tft(TFT_CS,TFT_DC);
Creates a display object called:
tft
This object controls the GC9A01 display.
Setup Function
The setup function runs once after ESP32 starts.
It performs:
- Serial initialization
- SPI setup
- Display startup
- Screen configuration
Serial Communication
Serial.begin(115200);
Starts communication with Serial Monitor.
Useful for debugging.
Starting SPI
SPI.begin(TFT_SCLK,-1,TFT_MOSI,TFT_CS);
SPI format:
SPI.begin(clock, MISO, MOSI, CS)
ESP32 connection:
| SPI Signal | Pin |
|---|---|
| Clock | GPIO22 |
| MISO | Not Used |
| MOSI | GPIO21 |
| CS | GPIO2 |
Starting Display
tft.begin();
Initializes:
- GC9A01 controller
- Display memory
- SPI communication
Screen Rotation
tft.setRotation(0);
Controls display direction.
Options:
0 Normal
1 90 Degree
2 180 Degree
3 270 Degree
Clearing Display
tft.fillScreen(GC9A01A_BLACK);
Sets complete screen background color.
Available colors:
BLACK
RED
GREEN
BLUE
WHITE
YELLOW
Setting Text Position
tft.setCursor(20,100);
Sets the location where text starts.
Format:
setCursor(X,Y)
Setting Text Color
tft.setTextColor(GC9A01A_GREEN);
Changes text color.
Example:
tft.setTextColor(GC9A01A_RED);
Setting Font Size
tft.setTextSize(2);
Controls text size.
Examples:
1 = Small
2 = Medium
3 = Large
Printing Text
tft.println("ESP32");
Displays text on the TFT screen.
Output:
ESP32
GC9A01 TFT
Loop Function
void loop()
{

}
The loop runs continuously.
It is empty because the display only shows fixed text.
For animation:
void loop()
{
 tft.fillCircle(120,120,30,GC9A01A_RED);
 delay(500);
}
Graphics Examples
Draw Circle
tft.drawCircle(120,120,50,GC9A01A_BLUE);
Fill Rectangle
tft.fillRect(50,50,100,50,GC9A01A_RED);
Draw Line
tft.drawLine(0,0,200,200,GC9A01A_GREEN);
Troubleshooting
White Screen
Check:
- 3.3V power
- CS pin
- DC pin
- SPI wiring
Nothing Appears
Try:
- Verify library installation
- Check display address
- Check solder connections
Wrong Orientation
Change:
tft.setRotation(1);
Project Applications
Smart Watch
Create a round user interface similar to commercial watches.
IoT Dashboard
Display:
- Temperature
- Humidity
- Sensor data
Digital Clock
Show:
- Time
- Date
- Weather
Robotics
Display robot status and controls.
Advantages of ESP32 + GC9A01
- Low-cost hardware
- Fast graphics
- Compact design
- Wireless capability
- Easy Arduino programming
- Suitable for beginners
Conclusion
The ESP32 and GC9A01 round TFT display combination is a powerful solution for creating compact graphical projects. With only a few SPI connections and simple Arduino programming, you can build advanced displays for IoT, wearable devices, automation systems, and embedded applications.



Leave a Reply
You must be logged in to post a comment.